


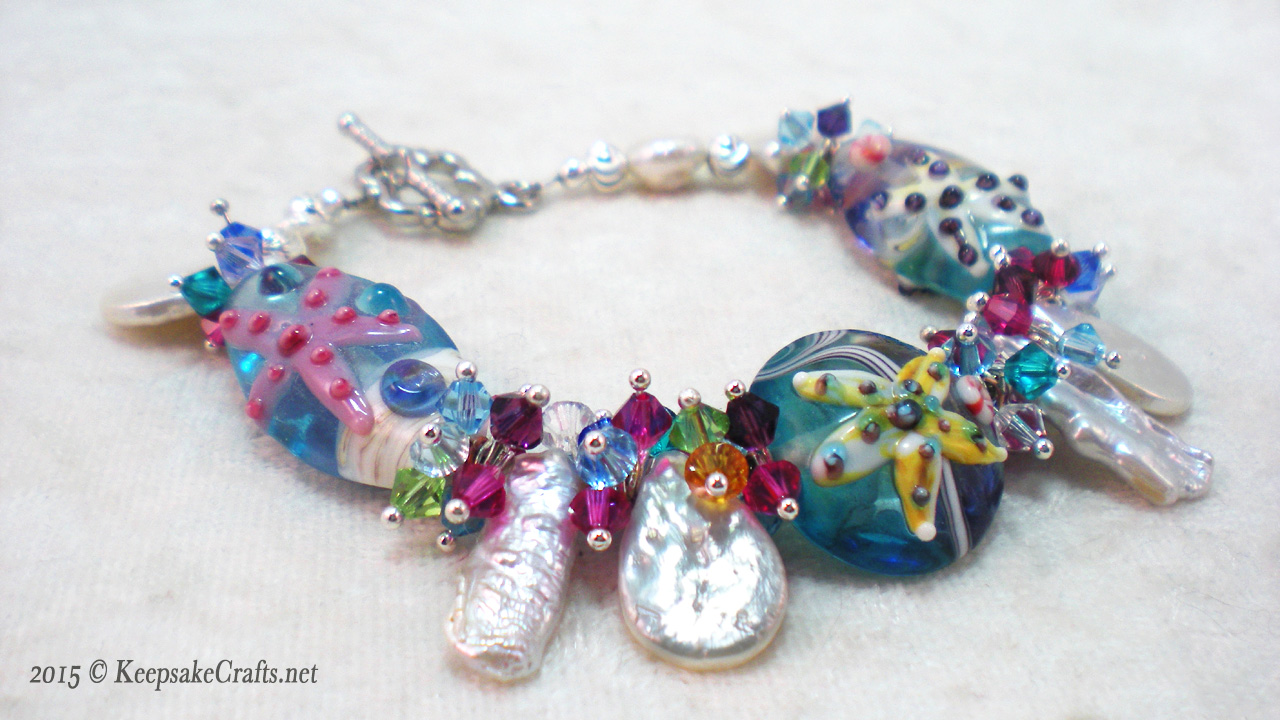
This bracelet started, as many of them do, with the focal beads. I just love the colors and the summery images. This set was purchased at a bead show, sorry I can’t remember the name of the vendor. However, you will be able to find many beads like them for sale on Etsy and Ebay. Try searching for “summer beach lampwork beads.”
This is a fairly simple stringing project. The tedious bit was making 64 little bead dangles. The 1-Step Looper helped that process go more quickly, but it still took a while.
I’d love it if you shared photos of your projects based on this tutorial at my Facebook page in the “Your Creations” album.
Enjoy the video and happy creating!
You can watch the Summer Sparkles Bracelet Video Tutorial over at YouTube.
Materials:
- 3 lampwork focal beads, 20-30mm
- 6-8 blister pearl beads
- 64 4mm Swarovski crystal bicone beads
- 64 silver plated ball end headpins
- additional silver spacer beads as needed
- silver plated toggle clasp
- 2 silver plated crimps
- 2 silver plated wire protectors
- 2 silver plated crimp covers
- 12-inches .48mm bead stringing wire
Tools:
- chain nose pliers
- round nose pliers
- wire cutters
- crimping pliers
- One Step Crimper
- 1-Step Looper
- Bead Design Board
- Bead Stoppers
- Slide each 4mm crystal bead onto a head pin. Use round nose pliers or the 1-Step Looper to make simple loops in each headpin, making 64 bead dangles.
- Separate dangles into eight piles of eight each.
- Add a Bead Stopper to one end of bead stringing wire. Onto wire string: two pearl beads > loops of eight bead dangles > lampwork focal bead > loops of eight bead dangles > pearl bead > loops of eight bead dangles > pearl bead > loops of eight bead dangles > lampwork focal bead > loops of eight bead dangles > pearl bead > loops of eight bead dangles > pearl bead > loops of eight bead dangles > lampwork focal bead > loops of eight bead dangles > two pearl beads.
- Add a Bead Stopper to other end of wire and check fit of bracelet. If needed string additional silver bead spacers between and/or after beginning and ending pairs of pearl beads.
- To finish ends remove one bead stopper and onto bead stringing wire slide a crimp, then slide wire into one end of wire protector and out the other. Add one end of your clasp to the wire protector. Slide the wire end back through the crimp and bring crimp to within 1/8-inch of wire protector. Flatten crimp or use One Step Crimper, then squeeze ends of wire protector together. Trim shorter piece of wire close to crimp. Cover crimp with a crimp cover by picking up with crimping pliers, sliding over flattened crimp and gently squeezing pliers. Use crimping pliers to shape cover into a round bead shape if necessary.
- Repeat step 5 to add other half of toggle clasp to other end of bracelet.

Okay, that is too cute!! Now I want to go to the beach!
I know just what you mean. 🙂