


You may not think of your computer scanner as a crafting tool, but there is so much you can do with it!
Lately I’ve been using my scanner mostly to scan old photos that I plan to scrapbook. There are several good reasons for scanning them instead of using the originals:
- You preserve the original, especially important if you don’t have negatives
- You can correct any flaws in the original photo (see here for an example of a rescue of a really bad old photo)
- You can correct color shifts that may have occurred over time
- You can print out enlargements
- You can print out multiples for creative uses
One problem with scanners is that they often introduce color casts. For the longest time I didn’t realize this was why I was having so many problems getting nice colors, especially in the skin tones, from my old reprints. Not only was I trying to adjust for poor quality originals, color shifts over time, but my scanner was making everything really, really blue.
In the below example, the photo on the left shows my picture as it came off the scanner. The middle pic is after adjusting for the scanner cast (how my photo looks in real life) and the right pic is what the picture should have looked like originally.
A B C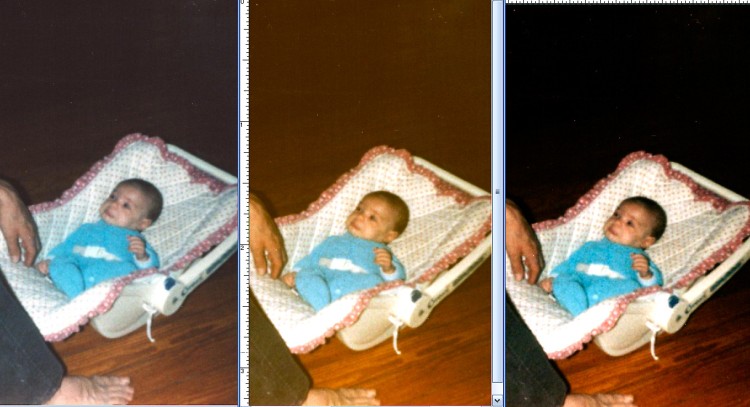
Believe it or not, it’s actually tough to get from A directly to C. It’s better to correct for one problem at a time.
To correct for scanner color cast you only need two things:
- Photo editing software, such as Adobe Photoshop or Adobe Photoshop Elements
- A photographer’s gray scale (sometimes called a gray card or a gray wedge.) What you need is something that is exactly 50% gray, that is, precisely 50% white and 50% black. (I found mine on Ebay for just a few dollars.)
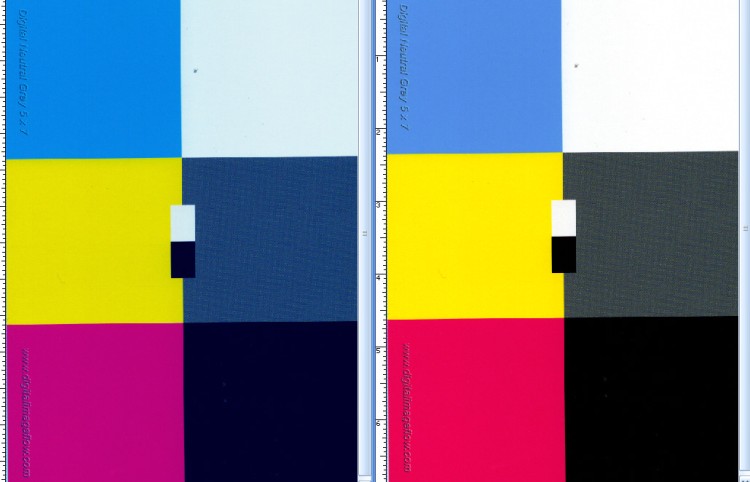
The first thing you need to do is scan your gray scale and open it in Photoshop. Use the same settings you use to scan in your photos.
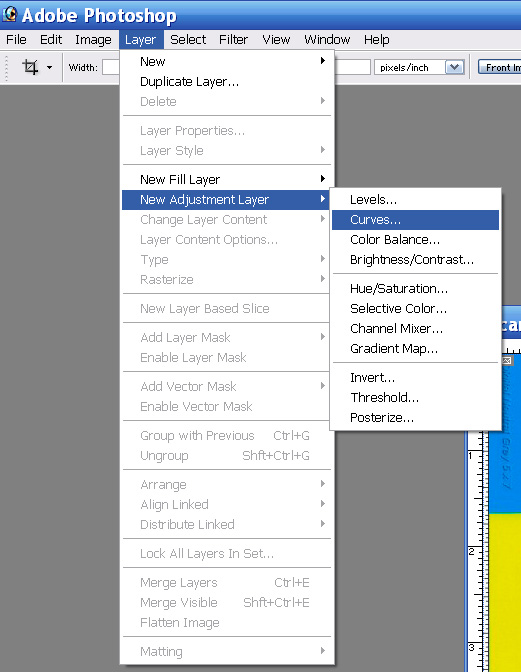
Next, you’ll need to create a new Curves layer. (This seems to be done a different way in every version of Photoshop I’ve seen. In Photoshop 7, which is what I have, you click on the small black & white circle under the Layers palette, then select “Curves.” )
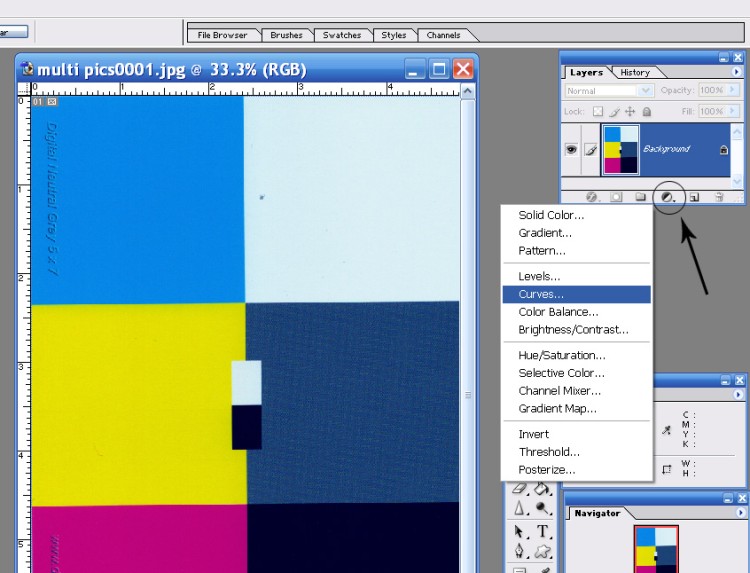 Now that you have your Curves layer, click on the Curves graph in the layers palette to open the Curves dialogue box.
Click on the middle eyedropper. It should say something like, “set gray point.”
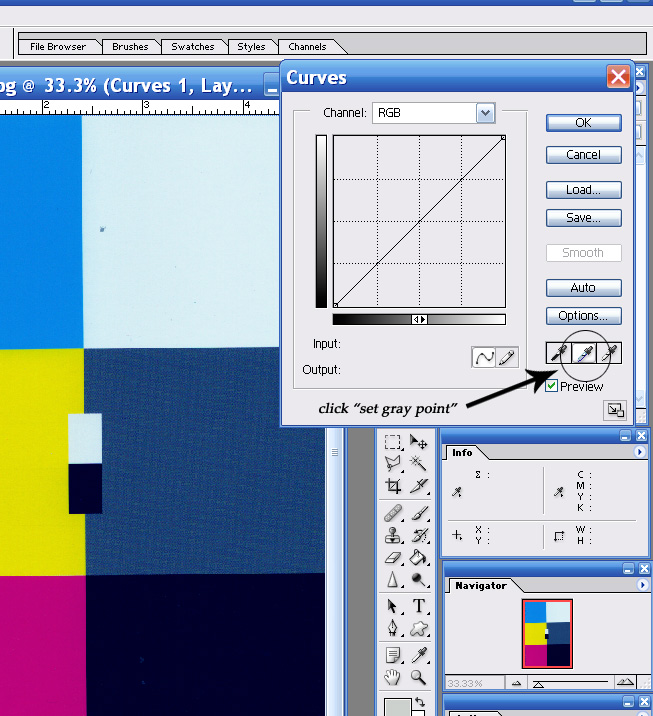
Now click on the section of your scanned gray scale that is supposed to be 50% gray. (Notice how blue mine scanned in!)
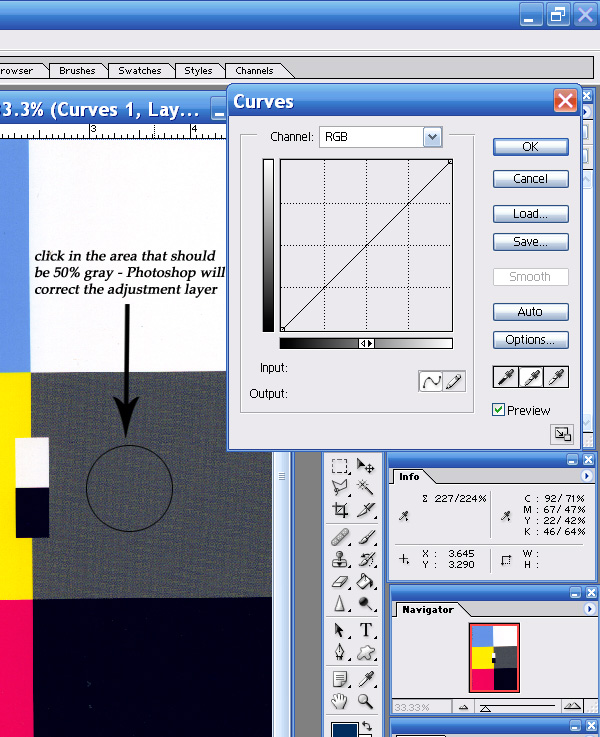
Photoshop makes the adjustment and now that section of your gray scale truly is 50% gray.
At this point, your white section might look a little off. If it does, click on the right eyedropper (“set white point”) and then click in the white area. It should turn perfectly white. Go ahead and click on the middle eyedropper and then the gray section once more.
Can you believe the difference? No wonder I wasn’t happy with the way my photos were scanning!
Once you’re satisfied with your adjustments, go ahead and click “Save” in the Curves dialogue box. Make sure to give your Curves layer a meaningful name, such as “scanner cast correction layer,” and save it someplace you’ll be able to find it later.
 The last step is make a Photoshop Action so we can easily and automatically apply this layer to any photo we scan in.
To do that, open the options in the Actions palette and select “New Action.” Give your Action a meaningful name like “correct HP scanner color cast,” and assign it a Function key. (For quick reference I have a list of all my actions and their function keys right next to my keyboard.)

Now click, “Record.”
From the toolbar at the top left of your screen select Layer > New Adjustment Layer > Curves
When the Curves dialog box comes up click on “Load,” and select the layer you saved earlier, it should be named something like “scanner cast correction layer.”
Now you can click “Ok,” and then stop recording. (In Photoshop 7 the “Stop playing/recording” button is the green square, not the red circle. This makes absolutely no sense to me, but there you have it.)

That’s it, your Action has been recorded and will play every time you press the corresponding Function key.
Now the next time you scan anything you can simply open it in Photoshop and press the correct Function key. (You DID write it down somewhere, didn’t you?) You’ll instantly have an adjustment layer that corrects the color for you. (If you want to save your photo as a jpg, bmp, etc, you’ll first have to go to Layers > Flatten Image.)
(If you ever get a new scanner, you’ll have to redo the process, as each scanner adds its own particular color cast.)
By the way, scanning is not only for photos. Have you considered scanning in household objects to make to make your own custom papers? How about scanning buttons, ribbons, fabric, paper clips, thread, pasta, utensils, seashells, book covers, food packaging, lace, pushpins, rubber bands, bubble wrap, confetti or yarn, just to name a few?
Have you ever needed “just a little bit more” of a particular paper or pattern? Now you can scan it in, correct the color and print exactly what you need. You can even print your own papers to match fabrics.
Ooooooo, yes, the possibilities are ENDLESS.
Have fun!
