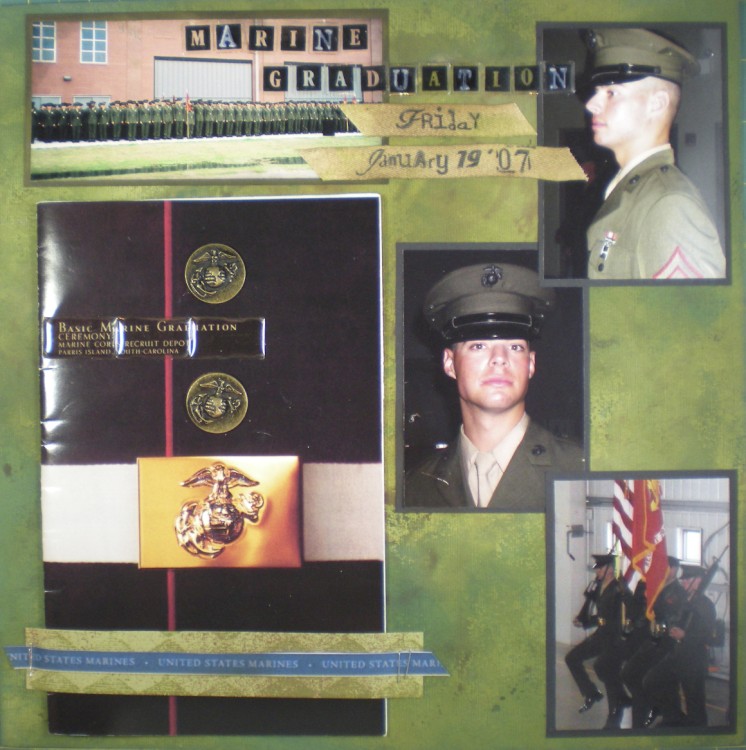
Here’s a scrapbook page that incorporates a large piece of memorabilia. Sometimes these kinds of things are tucked away in pockets and hidden, and sometimes they’re embraced as part of the design of the page.
I wanted the program from Josh’s boot camp graduation to not only be visible, but accessible. This was accomplished by stapling the green and blue paper strips near the bottom of the page, leaving a little space to accommodate the thickness of the program.
What isn’t pictured here is a slit in the page protector across the width of the program, near the top (centered on the top button.) The slit and the strip of paper are just enough to hold the program in place, but you can easily pull it out.
This is a trick I use often to be able to access items within scrapbook pages. You make the cuts by putting the page into the protector, then inserting a clear glass mat between the page and the plastic protector. Because the glass is clear you can see exactly where to make the cuts using a craft knife and a ruler.
Whenever you cut your page protector, make sure to add a small round punch to each end of the cut. This keeps it from continuing to split along the same line.
The date was done using my favorite date Clear Stamp – Messy Dates (Autumn Leaves by Rhonna Farrer). It was stamped on twill tape with Black StazOn Permanent Ink, then the tape was inked with Vintage Photo Distress Ink.
The background paper began its life as a solid Bazzil Basics cardstock, which I rubbed, dabbed and spritzed with Vintage Photo, Peeled Paint, Faded jeans and Walnut Stain Distress inks. I LOVE how you can completely change the look of papers with a few swipes of an ink pad!
Well, I’m nearly done showing you Marine Corps boot camp pics. This is good, as he’s nearly done with the Marine Corps, lol. It’s hard to believe it’s been nearly five years since we saw him off to boot camp.
Happy crafting!


I’ve done this too for my travel scrapbooks, where there are a lot of brochures to incorporate. Patsy from HeARTworks