


Much of the past holiday weekend was dedicated to making this.
(Click on any of the photos to see a larger image.)
“What is it?” you may ask. Well, let me ‘splain.
In the interest of being efficient while sewing, I made the observation that I always hold my scissors or snips in my right hand and thus thread tails and fabric trimmings end up in my left hand. The usual practice is to then reach across my body to drop them into the serger’s thread catcher, way to my right. This, of course, is silly and wasteful of time, energy and effort. (And who has extra time and energy these days? Not me.)
I decided to find a container for trimmings that would live to the left of my sewing machine. This Costco-sized cottage cheese bucket has been doing the job perfectly for some time now.
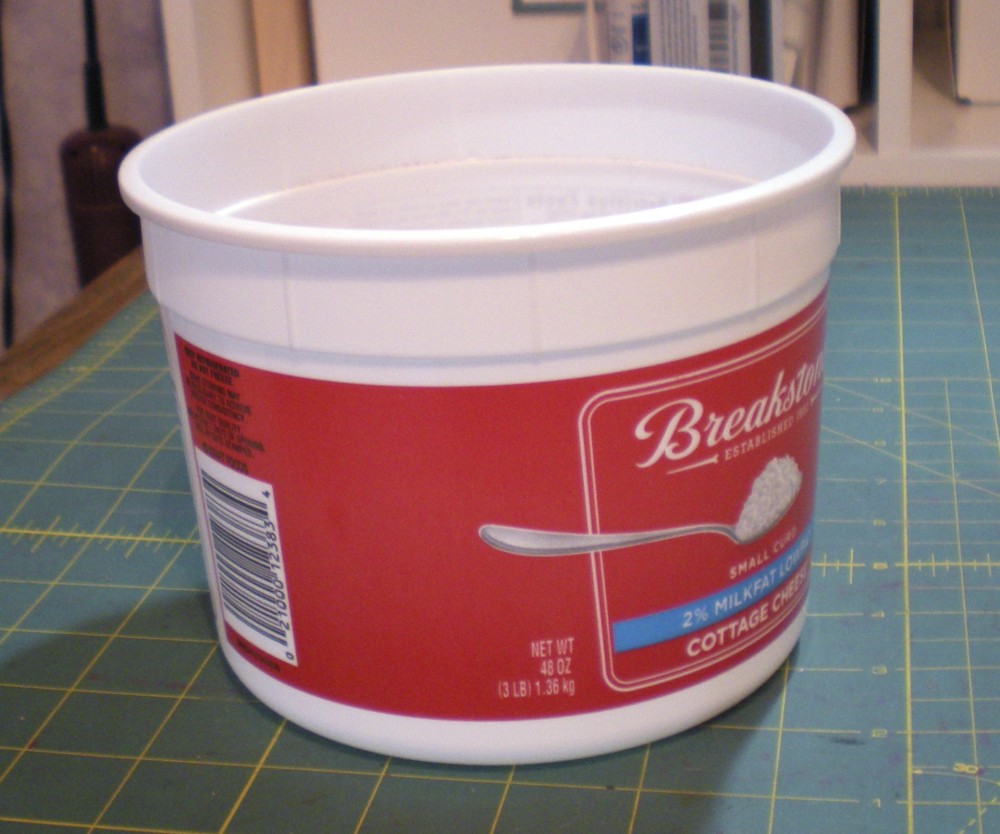
But it’s not very attractive, is it? It was crying out to be altered.
Most of you know I’ve been working through Tim Holtz’s 12 Tags of Christmas. I’m up to day 11, but I’ll skip that for now, as the plans for day 11 require supplies I’m still waiting for.
To cover this container I loosely followed Tim’s directions for the day 12 tag. His whole thing on day 12 was about using his Tissue Wrap. I don’t have any and can’t find it locally, so I made my own.
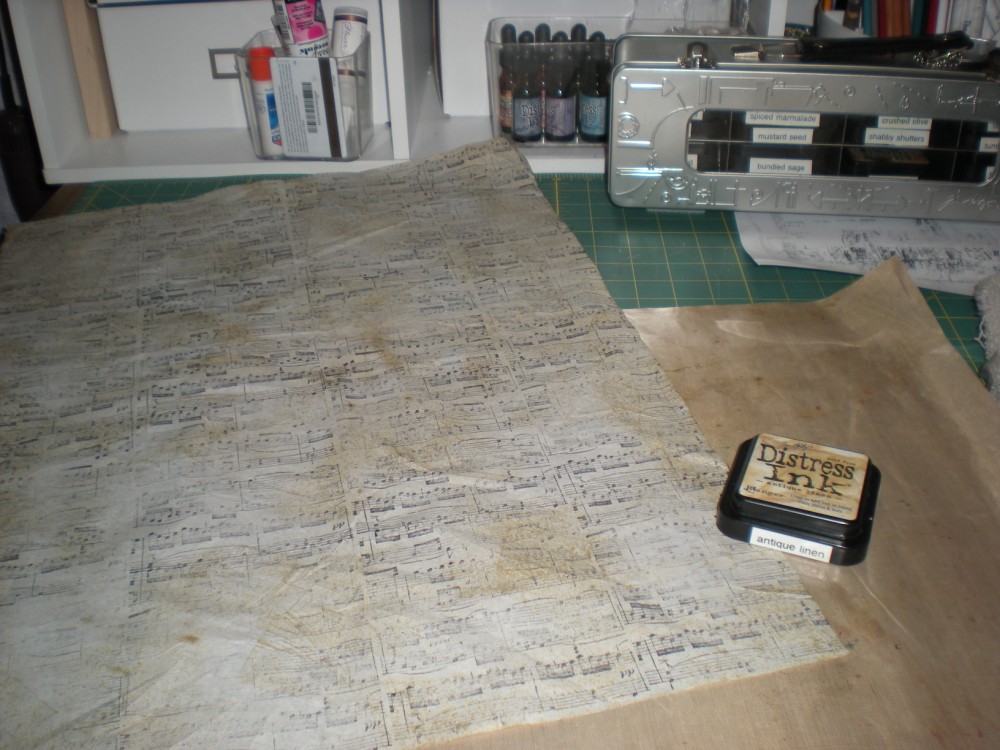
To make your own, use a waterproof ink such as Jet Black Archival Ink and stamp a piece of tissue paper all over with a large stamp such as Hero Art’s Music Background cling stamp, then rub Antique Linen
distress ink (or color of your choice) over everything.
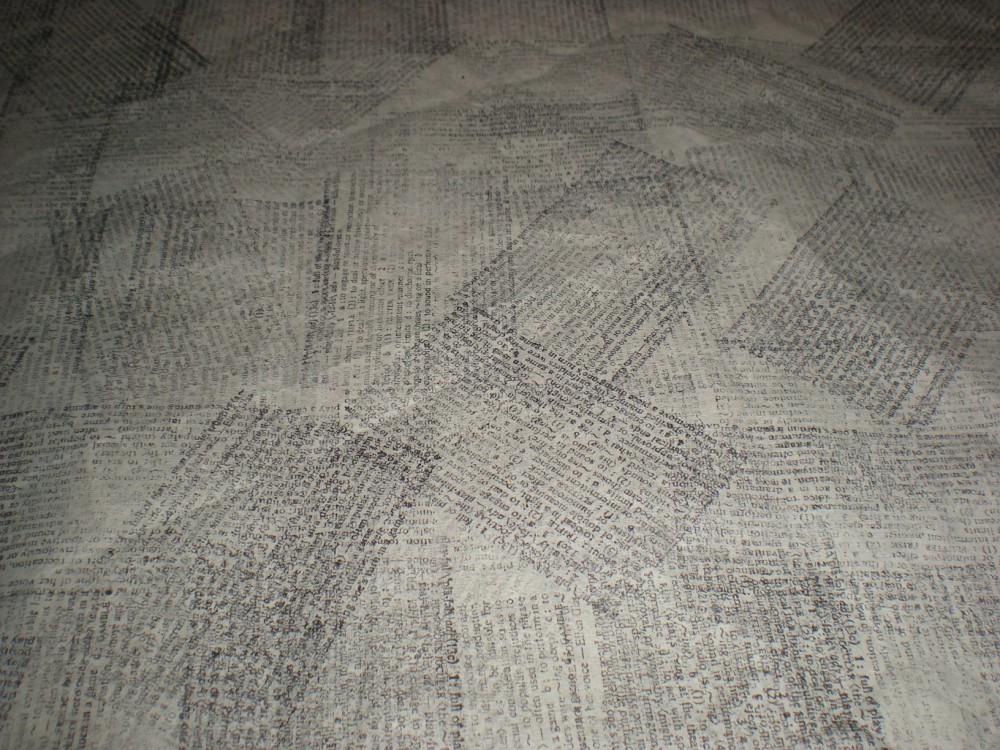
I stamped another piece of tissue all over with Hero Art’s Play Print definition stamp.
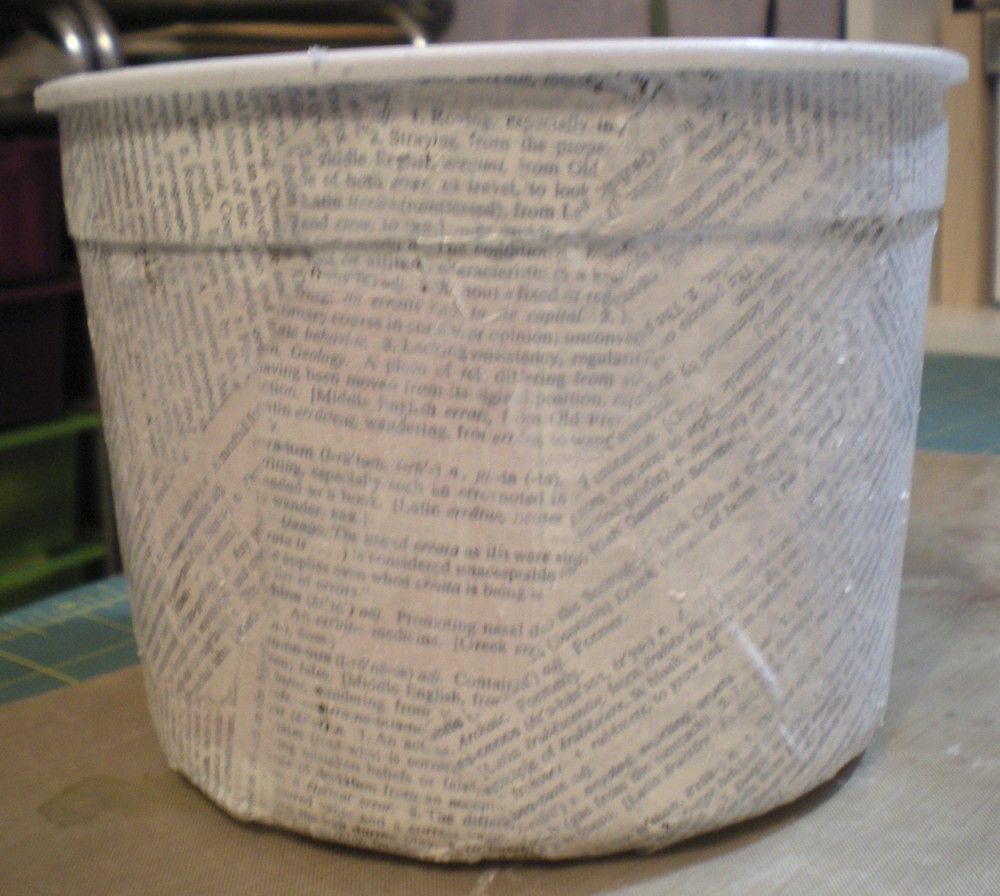
With that done, I started adding layers to my container. (Sorry there are only photos of the first two steps. I was having so much fun I forgot to take pics!)
Here are the layers: (Make sure to let each layer dry thoroughly before going on to the next step.)
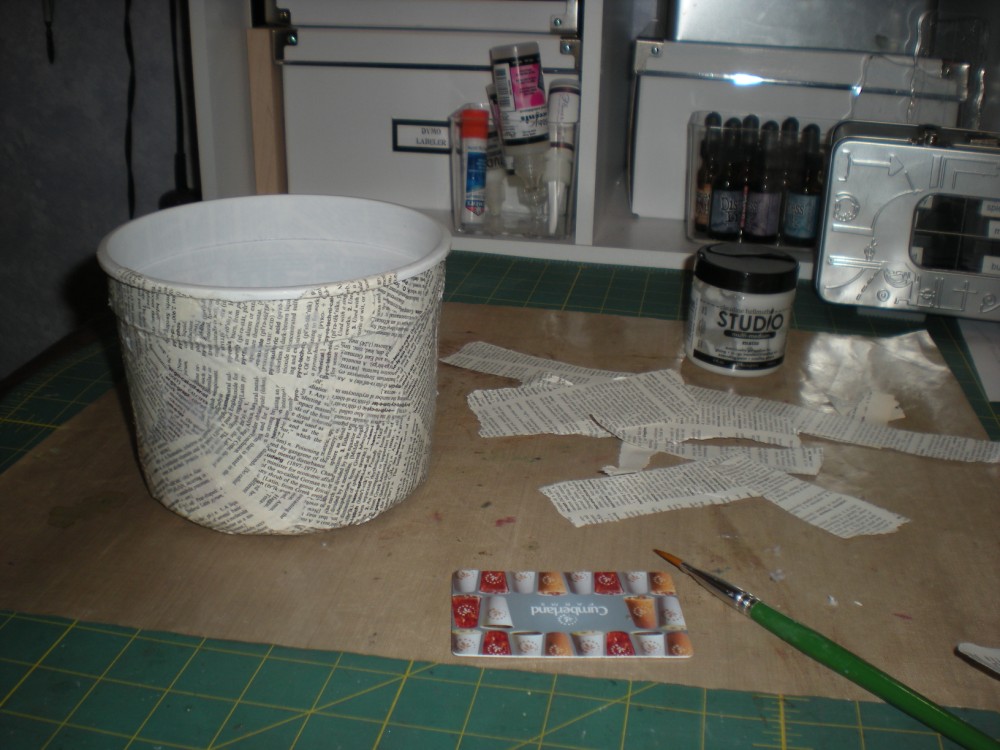
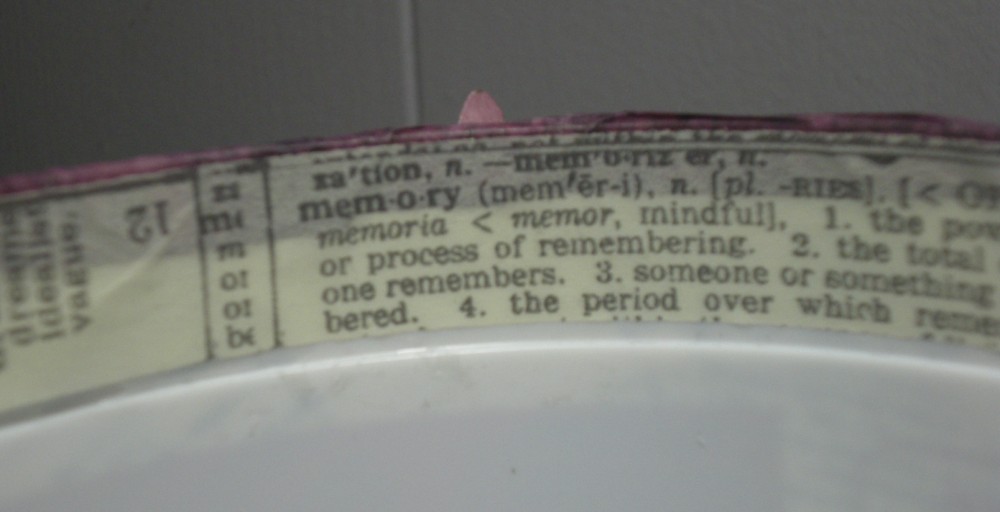
- Torn dictionary pages glued on with Matte Multi Medium. (Burnished smooth with an old gift card.)
- Picket Fence Distress Stain over all.
- The music stamped tissue paper added with thinned down tacky glue. Applied with wrinkles, per Tim’s directions.
- Wild Honey Distress Stain, Peeled Paint Distress Stain, Spun Sugar Distress Stain, Broken China Distress Stain, Dusty Concord Distress ink and Faded Jeans Distress Stain over everything, leaving some white space.
- Pearlized mist (made with Perfect Pearl
powder mixed with water in a Mini Mister
) sprayed over all. This blended the colors and gave a pearly sheen.
- Rock Candy Distress Crackle Paint over everything.
- Picket Fence Distress Stain applied to the lighter areas, buffed in lightly.
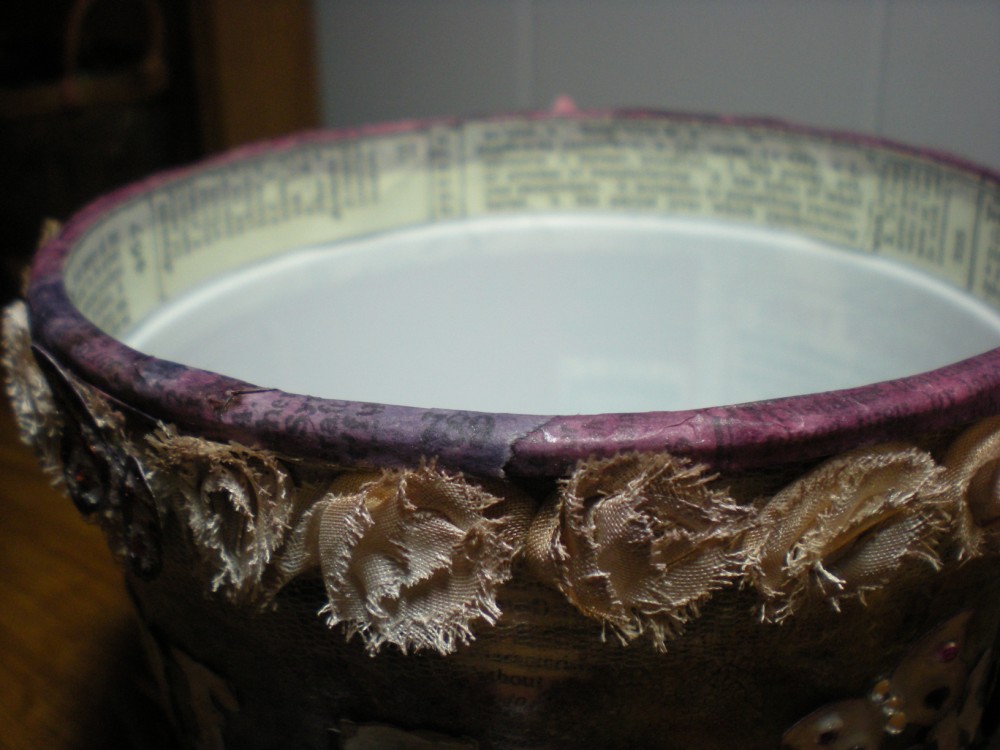
- To finish the top edge, color Symphony Tissue Tape
with Cranberry, Raisin and Eggplant alcohol inks. Apply tape to top edge of container, using a bone folder to smooth and tuck into overhang.
- Apply an uninked piece of Symphony Tissue Tape to inside edge of container, covering ragged edges of colored tape.
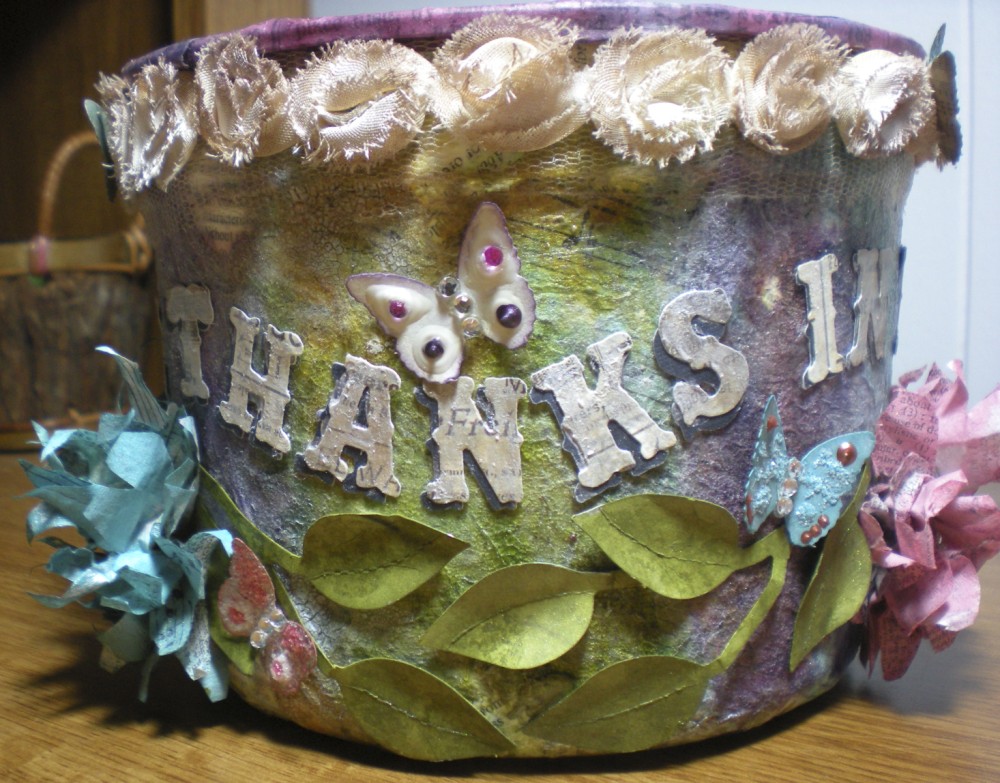
Here’s a closer look at the background.

To decorate the background I added:
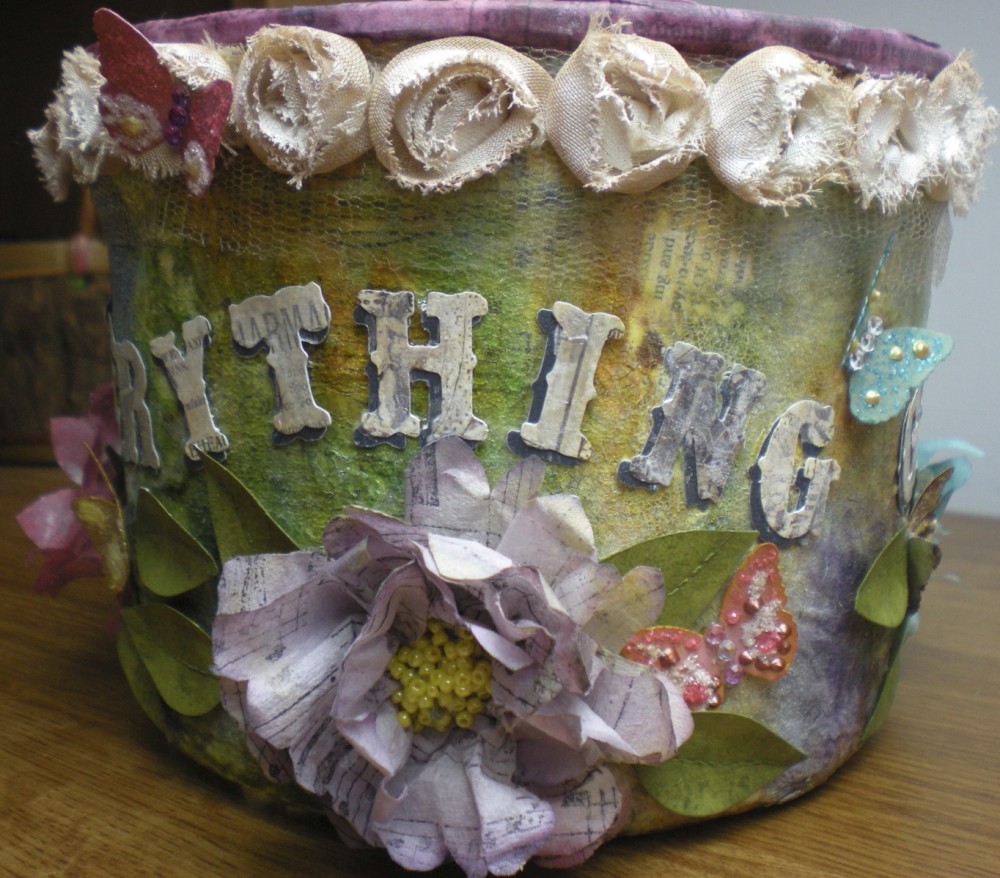
Tim Holtz Trimmings spritzed with Vintage Photo Distress Ink Reinker mixed with Perfect Pearls Heirloom Gold and water in a Mini Mister. Once dry the flower tops were dabbed with Pearl Paint Dabber
.
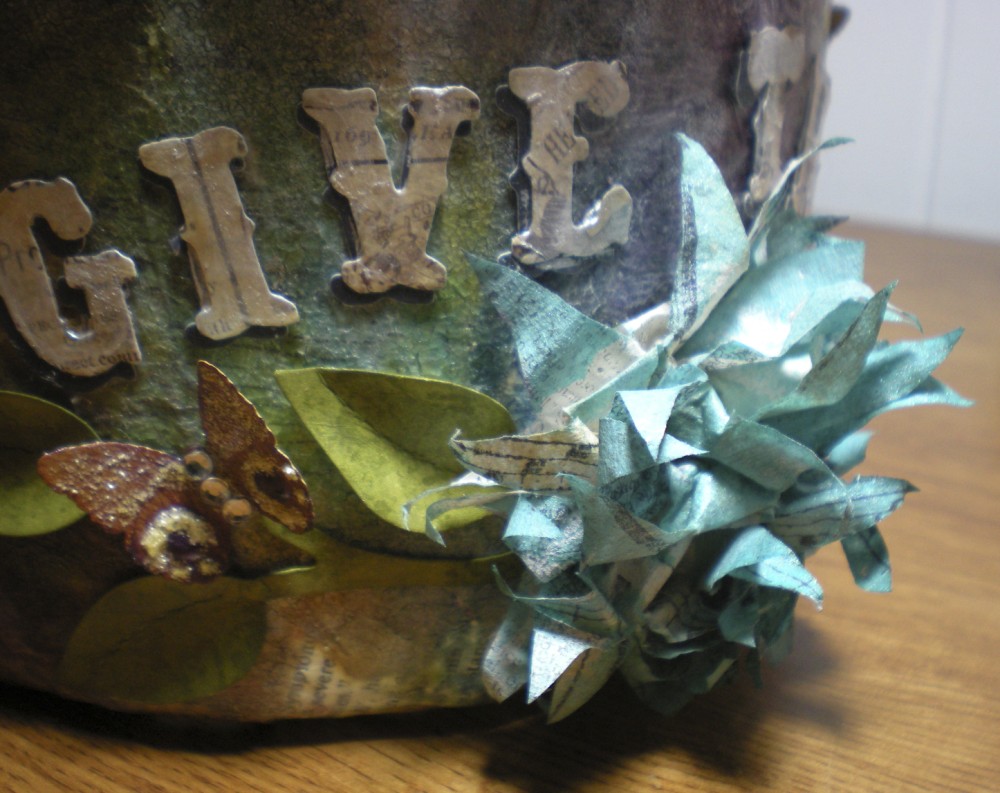
Letters cut with the Vintage Market Sizzlits Decorative Strip Die out of paper from the Crowded Attic Paper Stash. I really liked Tim’s idea for cutting out cardstock backed foil tape, but didn’t think metallic letters would look right on this project. I did LOVE his tip for cutting the same letters out of a darker color and placing them offset behind your title to really make it pop.
The letters read, “Give Thanks In Everything,” which is from I Thessalonians 5:18 and had been a theme of mine lately. The interesting thing about this being on a round container is that you can start at any word and not lose the meaning. (Try it!) Note that you will sound like Yoda if you start with “Thanks.” (“Thanks in everything give, hmmmmm……”)
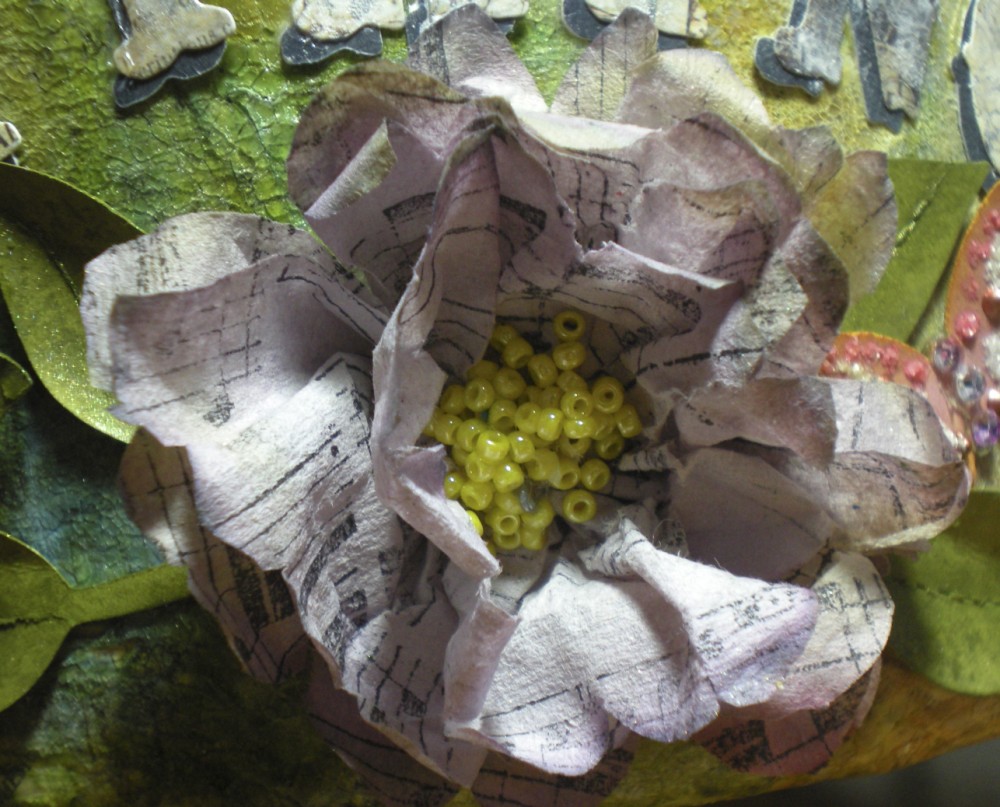
Tissue flowers made according to Tim’s directions on Tim’s directions for the day 12 tag. All these flowers are the same, the only difference is how I cut the ends, pointy, rounded or really rounded. Once they were fluffed out, I spritzed them with distress reinkers mixed with Perfect pearls in mini misters. I used Broken China Distress Reinker with Blue Patina Perfect Pearls, Worn Lipstick Distress Reinker with Perfect Pearls Heirloom Gold, and Dusty Concord Distress Reinker with Perfect Pearls Heirloom Gold. The beaded centers were made by adding a glob of Matte Multi Medium and sprinkling on seed beads. The matte medium is great because no shininess shows through the gaps once it’s dry.
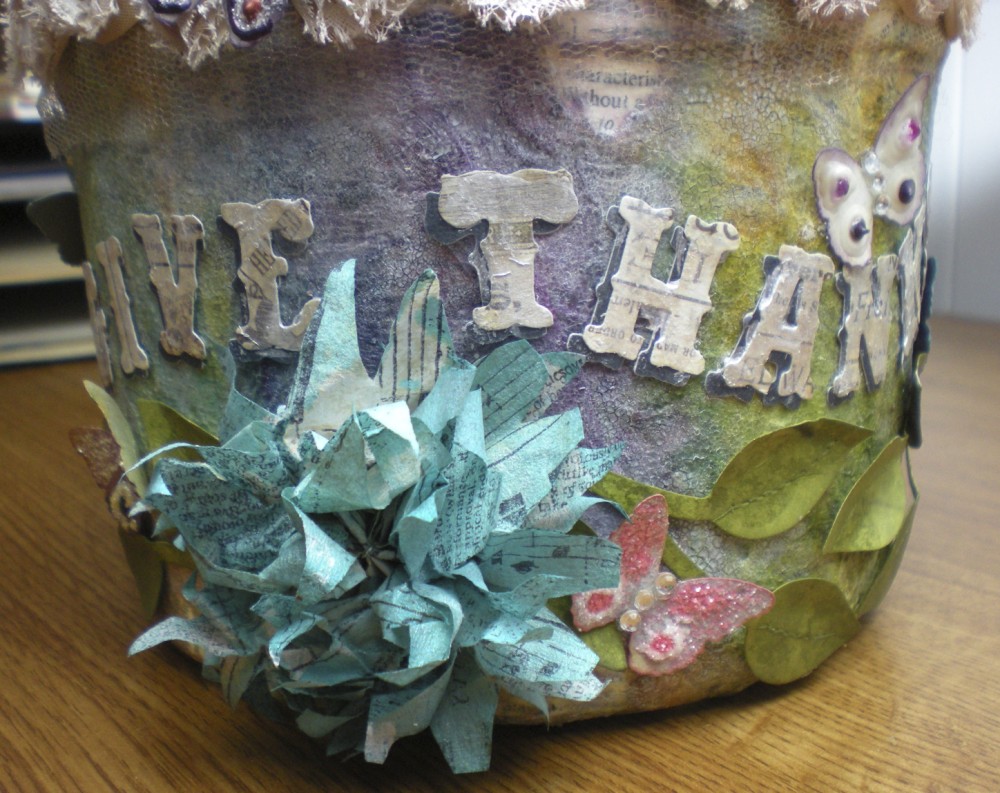
Leaves cut with a very old Sizzix die, a yellow one called “Leaf Stem.” These were cut from the Seasonal Paper Stash Pad, the edges inked with Peeled Paint Distress Ink, dabbed with Peeled Paint Distress Stain and brushed lightly with the green from the Perfect Pearls Aged Patina Set.
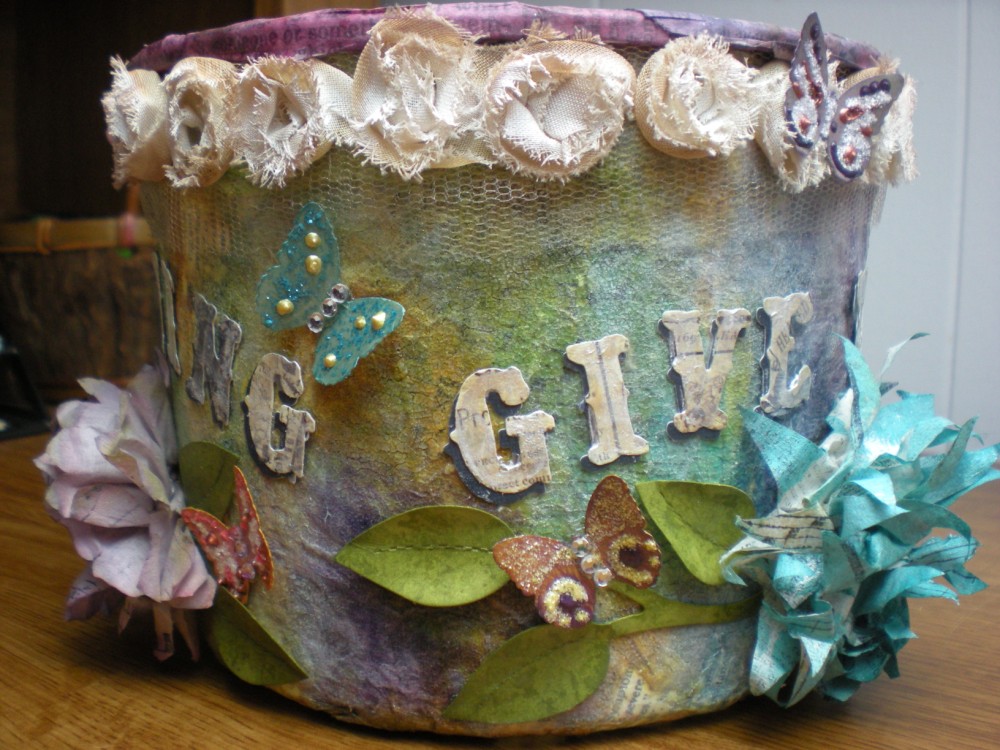
Butterflies punched with the Martha Stewart Classic Butterfly Punch out of the Seasonal Paper Stash Pad. You know those little 2 inch squares in the paper stash? You can get two butterflies out of each square. 🙂 I had a little too much fun late one night decorating the butterflies with all sorts of Stickles, including Worn Lipstick Distress Stickles, Broken China Distress Stickles
, Buttercup Liquid Pearls, frosted lace stickles and white enamel accents.
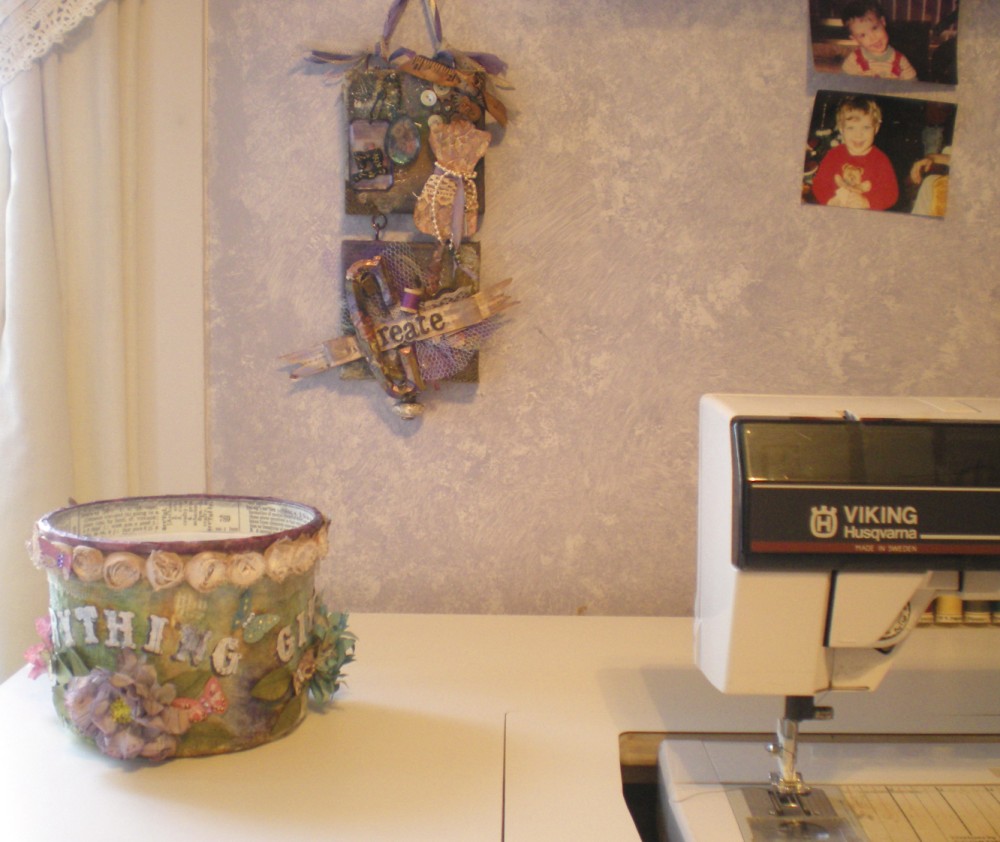
Here it is, right where it belongs. I’m going to enjoy looking at this much more than that ol’ cottage cheese container!
By the way, that cute little boy in red is going to be 22 tomorrow. I can hardly believe it.
Happy Creating, ya’ll!

I think this is absolutely beautiful, Sandy. It’s given me some very good ideas – I love the technique for the background! I use a wheelchair, and I have plastic spoke guards and have painted one set, and on the black set, I’ve stuck little gemstones, but have been thinking of doing a sort of collage set, and this is the technique I shall use for the background! I was wondering how to cover something that isn’t flat but slightly convex. I adore the subtle colours you’ve got with the Distress Stains (which have to be the most awesome product!!). With enough build-up of layers, and if I put a non-stick layer of something down first, I could use the plastic spoke guard as a template and could re-use it (they are quite expensive). Thanks for an awesome post – you’ve really inspired me! When they are done, it will be lovely to take my art out and about with me!!
Thanks so much for your comment on my blog, and I’m so glad you liked my butterfly project. I gave it to my sister today and she absolutely loved it!
Shoshi WOYWW #19
Hi Shoshi,
I’m so glad you were inspired! That, after all, is my main goal for writing this blog. 🙂
I have to say that I thought the Distress Stains looked terrible until I spritzed them with the pearlized water. Then, as if by magic, they turned all blendy and soft.
Hopefully, you’ll post your finished project when it’s done.
Have a great week!