


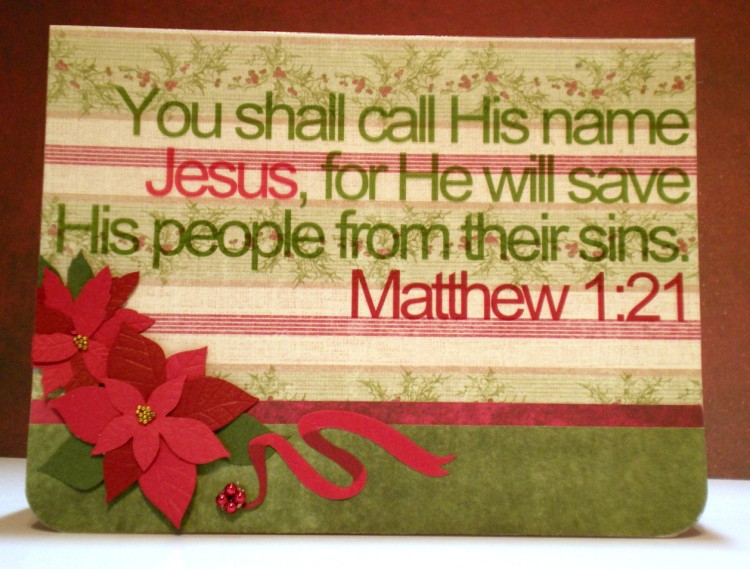
I’ve really been enjoying Kristina Werner’s Holiday Card series over at her blog. Her ideas are always have clean and simple lines, which makes them easy to adapt to your own style and supplies.
She made this one on Day 7 using her Silhouette. I don’t have a digital cutter so, at first I thought of printing out some lettering in reverse on the backside of cardstock and cutting that out with a craft knife. Then I looked at the quantity of cuts and decided one would have to be CRAZY to do that.
So, instead, I printed my words on a transparency. The only problem was adhering it down invisibly. Some vellum adhesive worked quite nicely.
If you don’t count the time spent fiddling with fonts, sizes, colors and arrangement, this is a fairly quick card. 🙂
Supplies used:
Pattern papers: Seasonal Paper Stash Paper Pad (Tim Holtz), Yuletide 12X12 Specialty Paper Pad (K & Company)
Font: Arial
Software: Printmaster – Platinum Version 18 (I’ve been using Printmaster since version 4.0 and love it for all kinds of desktop publishing uses.)
Glue: EK Zig 2-Way Chisel Glue Pen, Mono Vellum Adhesive Dispenser, 3/16-Inch Mini Glue Dots Roll
Transparency: Computer Grafix Ink Jet Film, Clear
Stickers: Jolee’s Boutique Dimensional Stickers – Poinsettias & Holly
Corner rounder: Memory Makers
********************************************************
Kristina has the most beautiful handwriting, and she uses it often on her cards. See Day 8, for example.
My handwriting is terrible. It doesn’t matter how careful I am or how slowly I go, it is definitely NOT card-worthy.
However, I love this stamp and was dying to use it, so here we are. First I stamped the image with Distress Embossing Ink and then embossed with fine black embossing powder. You could also stamp it in black and then emboss with clear. The idea is to make it waterproof and give a little barrier for the watercolors.
After embossing, I used watercolor pencils to color it in. Fun, quick and easy!
I used Spellbinders to cut the felt. Even with a shim in my Big Kick, it didn’t cut through completely, but it was enough.
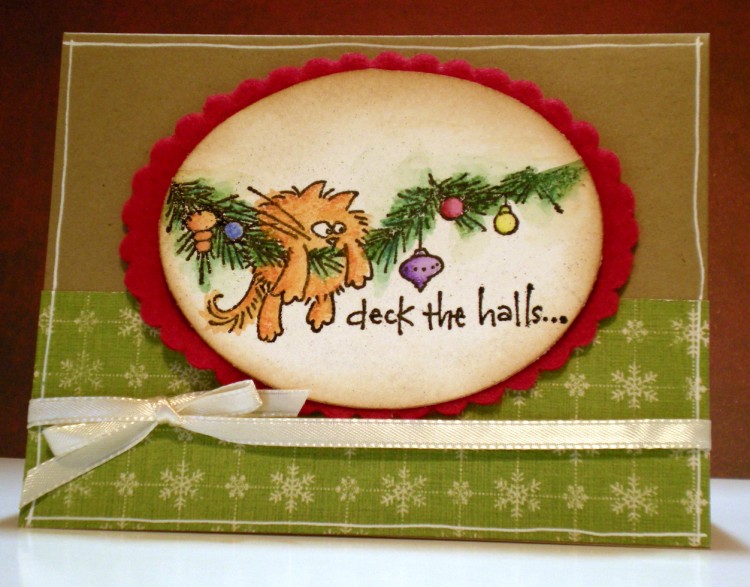
Supplies used:
Watercolor paper: Strathmore Series 140 Lb. cold press 9″ x 12″ Watercolor Pads
Stamp: Fluffles Garland – Rubber Stamps (Stampendous)
Ink: Vintage Photo Tim Holtz Distress Ink , Ranger Tim Holtz Distress Ink Pad, Clear For Embossing
Embossing powder: Super Fine Detail Embossing Powder, black (Ranger)
Watercolor pencils: Faber-Castell 24-Color GRIP Watercolor EcoPencil Set
Oval template: Coluzzle nested ovals
Die cut: Spellbinders Nestabilities Large Petite Scalloped Ovals Die Template
Gel Pen: Uni Ball Signo Gel Pen Broad Point
Adhesive: 3/16-Inch Mini Glue Dots Roll
Other: red felt, ribbon by Offray
The glittered chipboard letters were white and I colored them with alcohol ink. This is a great way to stretch your supplies, buy things in white and then color them to meet your needs.
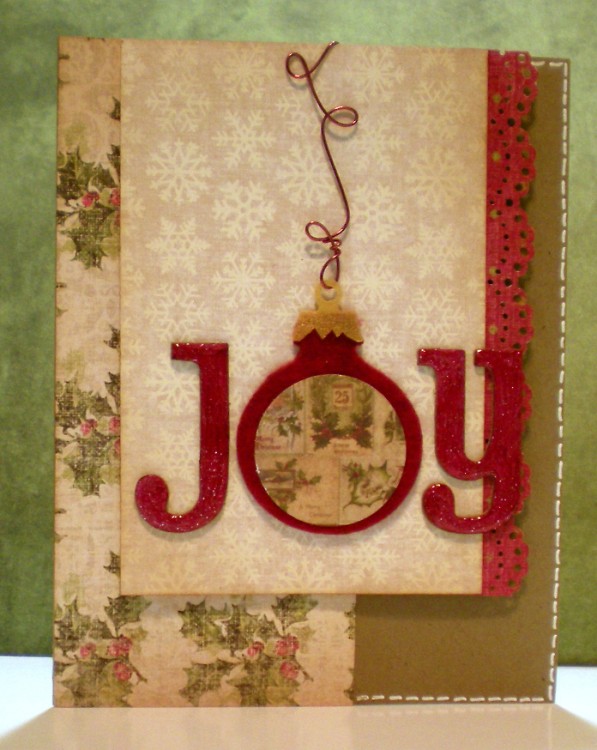
Die: Yellow Die – Ornament (Sizzix)
Pattern papers: Yuletide 12X12 Specialty Paper Pad (K & Company)
Scallop Punch: Doily Lace Edge Craft Punch (Martha Stewart)
Circle punch: Circle 1.25 Inch Paper Shapers Nesting Punch (EK Success)
Ink: Ranger Adirondack Alcohol Ink, Cranberry, Vintage Photo Tim Holtz Distress Ink , Fired Brick Tim Holtz Distress Ink
Gel Pen: Uni Ball Signo Gel Pen Broad Point
Glue: Matte Multi-Medium 4Oz
Wire: 22 gauge copper wire
Other: red felt, gold metallic paper, glittered chipboard letters
