


So, I’ve been trying to get caught up making Christmas cards inspired by Kristina Werner’s Holiday card series. Here are the ones I made today.
I really like the vellum window, but it took quite a bit of time to cut out the pieces. The way I did it I had to cut the window three times. Once out of the card, once from the red cardstock and once from another cardstock to go on the inside to keep everything neat. Definitely not a quick project. (Based on the Day 3 card).

Supplies used:
Clear stamp: Inkadinkado 7-Piece Snowflakes A-Plenty Clear Stamp
Pattern papers: Seasonal Paper Stash Paper Pad (Tim Holtz), Yuletide 12X12 Specialty Paper Pad (K & Company)
Scallop Punch: Scallop Sentiment Border Punch (Fiskars)
Embossing Powder: Zing! White Opaque Embossing Powder (this seems to be out of stock everywhere, glad I got some when I did!)
Rub on : Snow Flurries (October Afternoon)
Ribbon: Offray
********************************************************
Next up is my card based on her day 4:
I stamped the reindeer with Fired Brick Distress Ink and then embossed with clear. This really made it pop nicely.
When embossing on vellum, have your heat tool already hot and heat the vellum no more than necessary, keeping the tool moving. This will keep buckling to a minumum.

Supplies used:
Pattern papers: Seasonal Paper Stash Paper Pad (Tim Holtz), Yuletide 12X12 Specialty Paper Pad (K & Company)
Stamp: Christmas Silhouettes Clear Stamps 5 pc Set Inkadinkado
Circle Cutter: EK Success Circle Scissor Pro
Ink: Fired Brick Tim Holtz Distress Ink
Embossing powders: Ranger Embossing Powder 1-Ounce, Clear, Zing! White Opaque Embossing Powder 1 oz (this seems to be out of stock everywhere, glad I got some when I did!)
Glue pen: EK Zig 2-Way Chisel Glue Pen
Ribbon: Morex Corps, Sweet Petites, Sonya Red, 5/8″
********************************************************
I’m not really thrilled with the mix of lettering on this card, but, I was using up what I had rather than buying new. Sometimes you just gotta make do, ya know?
The inspiration is Kristina’s day 5 card.
I apologize that I don’t know the source of any of the chipboard pieces I’m using on these cards. It was from a box I picked up on clearance at Joann’s a year or so ago.
The good news is that not having the exact same supplies forces us all to be even more creative! 🙂
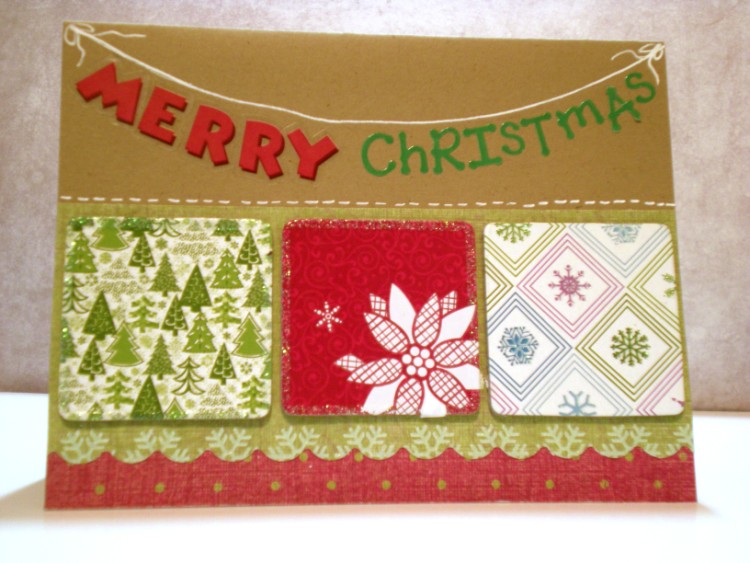
Supplies used:
Alpha stickers: Mickey Alphabet sheet, red (Sandy Lion), Little Letters, 1/2″ green (Making Memories)
Scallop Punch: Scallop Sentiment Border Punch (Fiskars)
Pattern papers: Yuletide 12X12 Specialty Paper Pad (K & Company)
Rub ons: Eskimo Kiss (Basic Grey)
Gel Pen: Uni Ball Signo Gel Pen Broad Point
***************************************************
And the last one I made tonight was based on the day 6 card:
The “peace” letters look much cooler in person. I started with grungeboard alpha minis, painted them white and then coated with Stardust Stickles. Love that sparkly look!
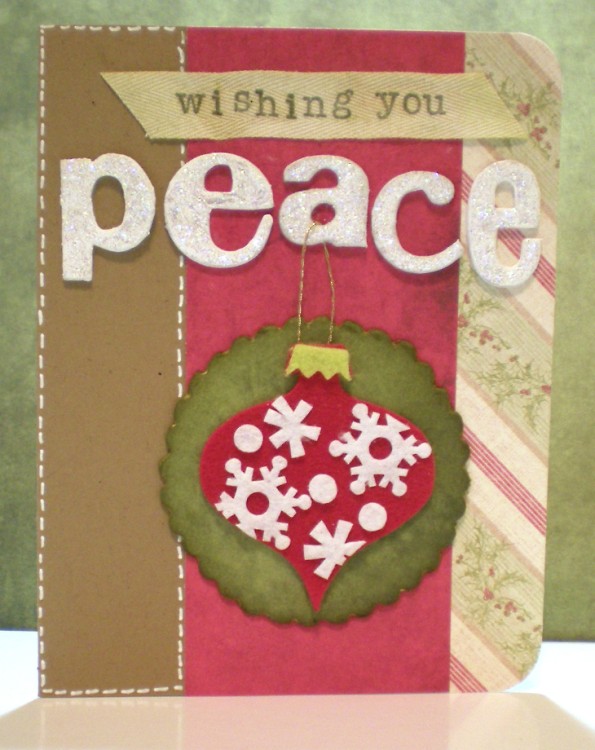
Supplies used:
Pattern papers: Seasonal Paper Stash Paper Pad (Tim Holtz), Yuletide 12X12 Specialty Paper Pad (K & Company)
Felt: 3D Felt Stickers (Joann’s)
Letters: Advantus Corporation Grungeboard Minis, Plain Alphabet
Paint: Snow Cap Paint Dabber
Glitter: Ranger 1/2-Ounce Stickles Glitter Glue, Stardust
Ink: Peeled Paint Tim Holtz Distress Ink
Cording: Darice Lame Cord 1 Ply 25 Yards Gold
Other: twill tape, Studio G Alphabet stamp set
Gel Pen: Uni Ball Signo Gel Pen Broad Point
